Most TikTok video quality problems come from four places: the light on your face, the distance between your mouth and the microphone, a handful of camera settings, and the upload itself. You can fix all four with the phone you already own. This guide shows how, which free apps do the heavy lifting, and why your sound deserves more attention than your camera.
The short version
- Light: face a window. Light from the front, never from behind.
- Sound: get the mic close. Every time you double the distance, your voice drops about 6 dB.
- Camera: lock exposure and focus, film 9:16 at 30 frames per second, and wipe the lens.
- Framing: keep faces and text away from the bottom and the right edge, where TikTok puts its buttons and caption.
- Upload: export 1080 × 1920 and post the original file, not a copy that went through a chat app.
Why TikTok video quality matters, but not the way you think
TikTok doesn’t ask for cinema. Its own advice to advertisers, the Creative Codes, sums up production in three steps. Shoot vertical at 9:16, use footage of 720p or higher, and save space on screen for the TikTok interface. The same guidance favours content that feels native to the app. So a phone video that looks like TikTok beats a glossy ad that looks like television. Good TikTok video quality means clarity, not polish.
What viewers do punish is effort. A dark face, an echo or a voice that is hard to follow makes people work. On a feed where the next video is one swipe away, they won’t. Sound in particular matters more than most creators expect. In a 2021 study by Kantar, commissioned by TikTok, 88% of TikTok users said sound is essential to the experience.
Bad audio also changes how people judge you. In 2018, psychologists Eryn Newman (Australian National University) and Norbert Schwarz (University of Southern California) played people the same scientific talks twice, once with clear audio and once with poor audio. With poor audio, listeners rated the speakers as less intelligent and less likable, and their research as less important. The words were identical. Only the sound had changed.
1. Light: face the window
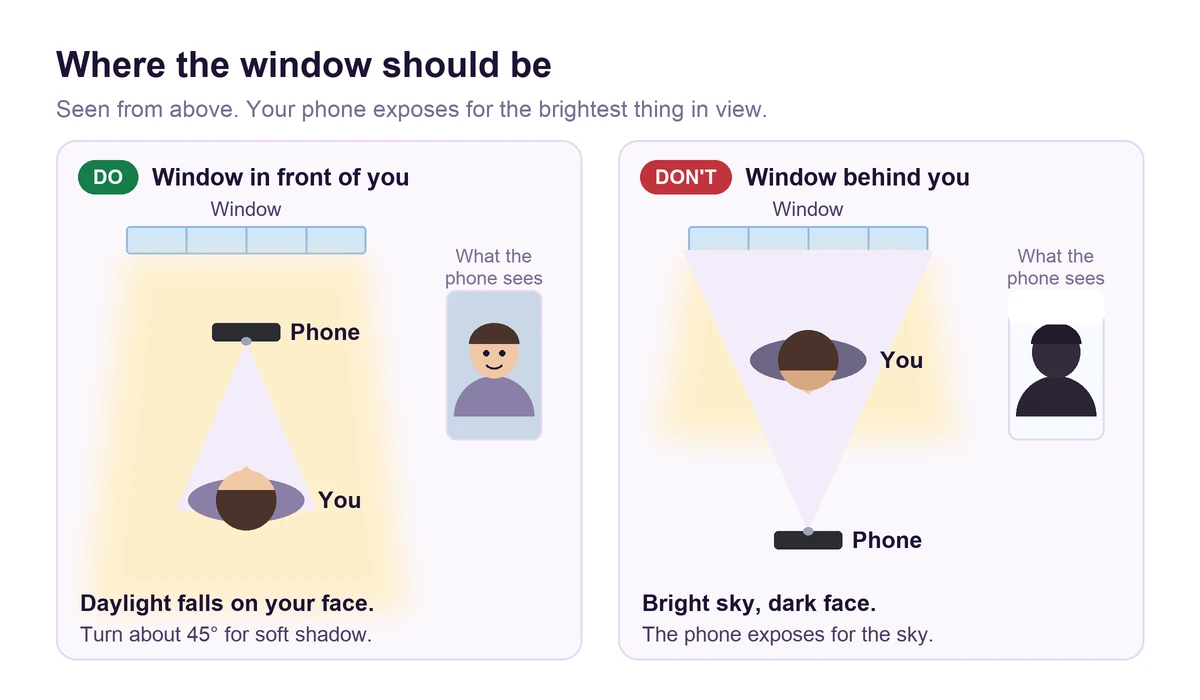
Light does more for your TikTok video quality than any phone upgrade, and the cheapest light you will ever own is a window. Face it, with the phone between you and the glass, and the light falls evenly across your face. Then turn a little to one side, about 45 degrees, and you get a soft shadow that makes your face look three-dimensional instead of flat.
Never sit with the window behind you. Your phone sets its exposure for the brightest part of the picture, so the sky comes out fine and you turn into a silhouette.
Three more habits make a big difference:
- Switch off the ceiling light. Indoor bulbs are warm, around 3200 K, while daylight sits around 5600 K. A mix of the two leaves one side of your face orange and the other blue, and your camera can only correct for one of them.
- Love cloudy days. Clouds spread the sun into one huge, soft light. Direct sun, by contrast, gives you hard shadows and a squint.
- After dark, use one light in front of you. A ring light works, and a lamp bounced off a white wall often looks softer. If skin looks slightly green, the lamp is the problem: look for an LED with a color rendering index (CRI) of 95 or more.
2. Sound: move the mic, not the volume
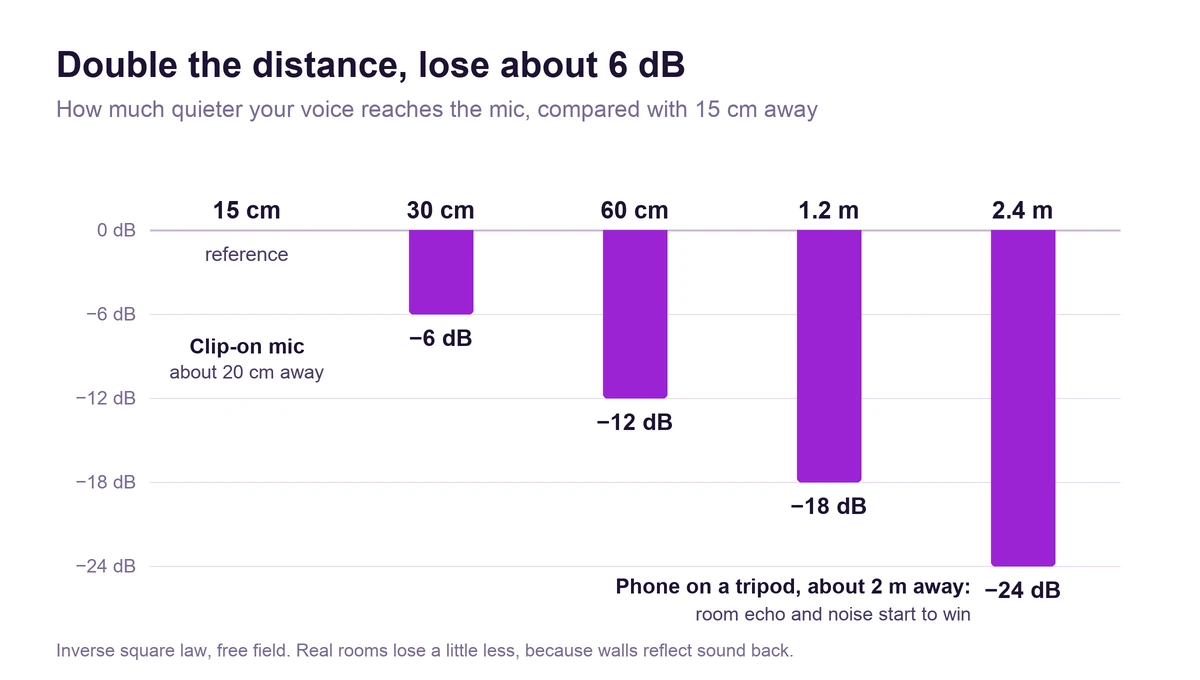
Here is the one bit of physics worth knowing. Sound spreads out as it travels, so each time you double the distance between your mouth and the microphone, your voice arrives about 6 dB quieter. A phone on a tripod two meters away therefore hears you roughly 20 dB quieter than a clip-on mic 20 centimeters from your mouth. The echo in the room and the hum of the fridge don’t get quieter with you, so they take over.
So the order of fixes is simple:
- Move the mic closer. For a voiceover, hold the phone as if you were making a call. To talk to camera, use a clip-on (lavalier) mic. Wired ones plug straight into the phone, while wireless kits clip a small transmitter to your shirt and plug a receiver into the phone.
- Soften the room. Echo comes from hard, empty surfaces. A room with a sofa, curtains, a rug or a bed sounds far better than an empty kitchen. A wardrobe full of clothes makes a surprisingly good vocal booth for voiceovers.
- Clean up afterwards. Your phone may already have the tool for it, as the next section shows.
Let your phone clean it up
Most recent phones can now remove noise from a video after you’ve filmed it:
- iPhone: Audio Mix in the Photos app works on videos recorded with Spatial Audio on iPhone 16 models, iPhone 17 models and iPhone Air. Studio reduces background sound and reverb, while In-Frame turns down sounds from outside the frame.
- Google Pixel: Audio Magic Eraser in Google Photos, on Pixel 8 and later.
- Samsung Galaxy: Audio Eraser in the Gallery app, on S and Z series phones from the S24 with One UI 7 or later.
- Any phone or computer: Adobe Podcast Enhance Speech runs in your browser. The free plan takes files of up to 30 minutes and processes up to one hour of audio a day.
- Adobe Premiere on your phone: Adobe’s free mobile editor has Enhance Speech built in. It reached iPhone in September 2025 and Android a year later.
Don’t push any of them to the maximum, though. Heavy cleanup makes a voice sound like it is underwater. Start in the middle of the slider and listen with headphones.
3. Camera: the settings that actually matter
Phones make good pictures automatically, which is also the problem: they keep changing their mind. Brightness and focus jump whenever you move or someone walks past. A few habits fix most of it:
- Lock exposure and focus. On iPhone, touch and hold your face on the screen until AE/AF Lock appears. Most Android camera apps have a similar long-press lock.
- Choose 30 frames per second for talking. Use 60 for sport, dance or fast hands. 24 looks cinematic but can stutter when things move quickly.
- Film in 1080p or 4K. 4K gives you room to crop or zoom in the edit.
- Use your best lens. On most phones that is the main rear camera, and the gap shows most in dim light. The front camera is fine for talking heads in good light.
- Wipe the lens. A fingerprint on the glass looks like a soft haze over the whole video. It is the cheapest fix in this guide.
- Keep it steady. A small tripod with a phone clamp costs little, and a stack of books costs nothing. Handheld talking-head clips wobble with every breath.
Want full manual control? Try Blackmagic Camera
Blackmagic Design, which makes cinema cameras, gives away a camera app with the same controls. Blackmagic Camera is free for iPhone and iPad, and for Samsung and Google Pixel phones on Android. You can set ISO, shutter speed, white balance and focus by hand and lock them. It also shows 9:16 frame guides for social media, and it has audio meters and support for external microphones.
The setting worth learning there is shutter speed. Filmmakers follow the 180-degree rule: a shutter speed of about double your frame rate, so 1/60 of a second at 30 frames per second. Movement then blurs the way your eye expects. In bright daylight, automatic mode often picks a much faster shutter, and that is why hand movements can look jittery on a phone.
4. Framing: eye level, and out of TikTok’s way
Put the lens at eye level, or slightly above. A phone looking up from a desk mostly shows your chin and the ceiling. Place your eyes about a third of the way down the screen, and leave a little space above your head, not a lot.
Then remember what covers your video. TikTok puts its buttons down the right edge, and your username, caption and sound over the bottom. TikTok tells advertisers that the safe area depends on the format, the caption length and any add-ons. In practice, keep faces and on-screen text in the middle, away from the bottom band and the right-hand column.
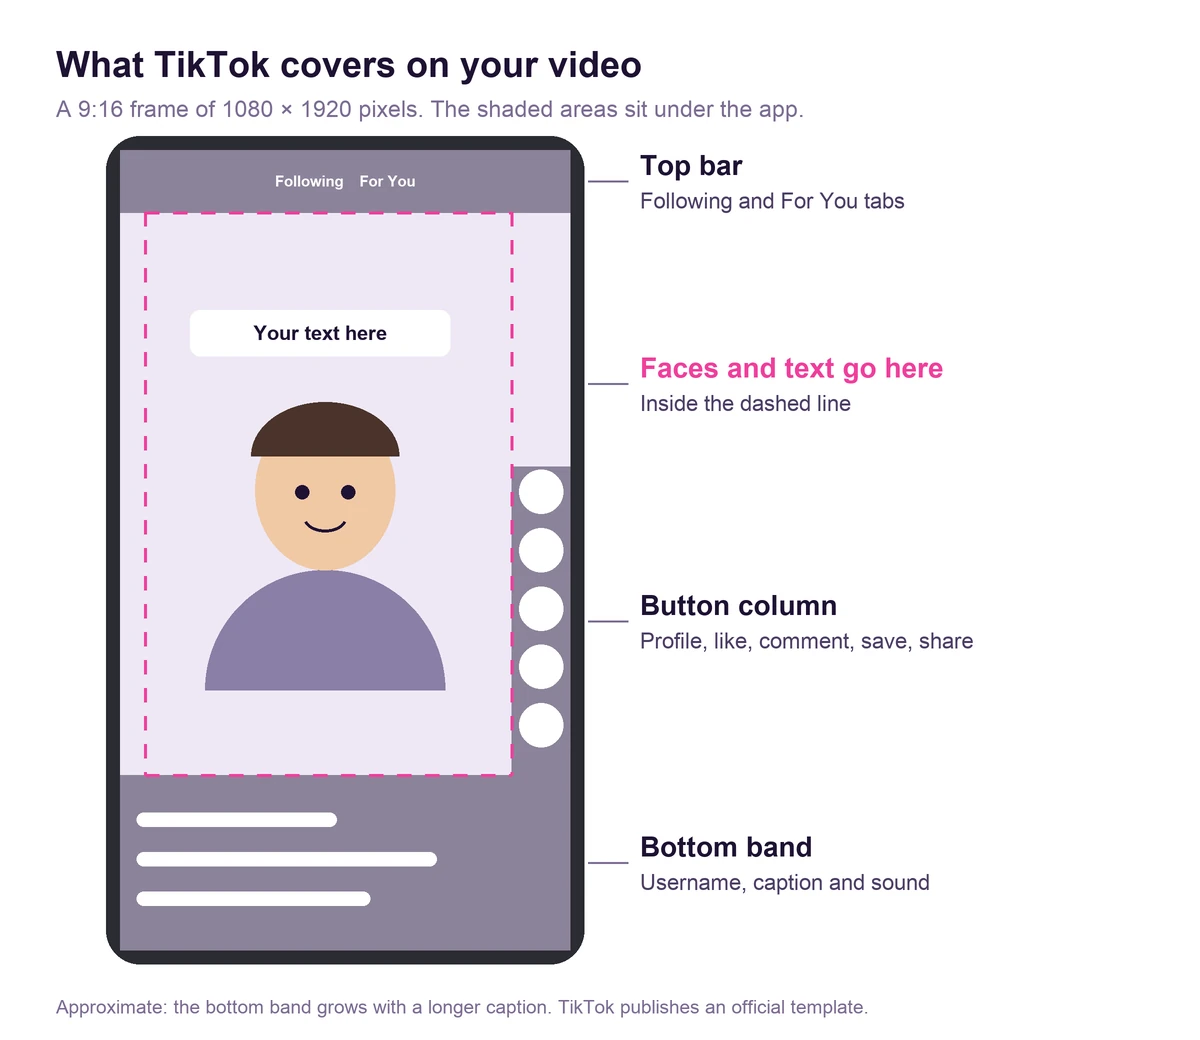
For text-heavy videos, download TikTok’s official safe zone template from the same help page and lay it over your edit.
5. Upload: don’t let compression undo your work
Every platform compresses video, and TikTok compresses hard. This is where a lot of TikTok video quality gets lost after you hit post. You can’t switch compression off, but you can stop making it worse:
- Export at 1080 × 1920 pixels, 9:16. A 4K export works too, but TikTok scales it down either way.
- Upload the original file. Each time a video passes through a chat app, a second editor or a screen recording, it gets compressed again, and the losses add up.
- Look for the high-quality upload switch. On the post screen, under More options, recent versions of the app offer to allow high-quality uploads. The label and its place change between versions, and not every account sees it.
- Check Data Saver if your own videos look soft. Under Settings and privacy, Data Saver lowers the quality TikTok streams to your phone. Your video can then look worse to you than to your viewers.
6. Talk to the lens, with a teleprompter if you need one
Looking at the lens instead of at yourself on the screen feels odd for about a week. After that, it becomes automatic, and to your viewer it is eye contact.
A teleprompter gets you there without memorizing a script. Instagram’s free editing app, Edits, added one in June 2025. In May 2026, Instagram also brought it into its main camera, with a script that scrolls just below the front camera at a speed you choose. Edits exports without an added watermark, so you can post the result on TikTok as well.
Record in short takes, too. One sentence or one idea per take is far easier than a perfect 60-second run, and the cuts keep the pace up. Your first sentence matters most, which is why we wrote a whole guide on how to write a TikTok hook.
Your kit, at three budgets
| Budget | Light | Sound | Camera |
|---|---|---|---|
| Nothing | A window in front of you | Phone close for voiceovers, a room with soft furnishings | Lock exposure, books as a stand, a clean lens |
| Small | A white sheet or foam board to bounce window light | A wired clip-on mic | A phone tripod with a clamp |
| Upgrade | One LED panel with adjustable color temperature | A wireless clip-on mic kit | Blackmagic Camera for manual control |
Spend in that order, too: light and sound first, camera last. For TikTok video quality, a new phone won’t fix a backlit face or a voice recorded from across the room.
The free tools in this guide
| Tool | What it does | Works on | Cost |
|---|---|---|---|
| Audio Mix (Photos) | Reduces background noise and echo after filming | iPhone 16, iPhone 17, iPhone Air | Built in |
| Audio Magic Eraser (Google Photos) | Turns noise down or off | Pixel 8 and later | Built in |
| Audio Eraser (Gallery) | Reduces noise, wind and other sounds | Galaxy S and Z series from the S24, One UI 7 or later | Built in |
| Adobe Podcast Enhance Speech | Makes a voice sound studio-recorded | Any browser | Free up to 1 hour a day |
| Adobe Premiere (mobile) | Editing with Enhance Speech, no watermark | iPhone and Android | Free core features |
| Edits | Editing and a teleprompter, no added watermark | iPhone and Android | Free |
| Blackmagic Camera | Manual camera controls and 9:16 guides | iPhone, iPad, Samsung and Pixel | Free |
Frequently asked questions
Why does my TikTok look blurry after I post it?
Usually because of compression on top of compression. Upload the original file instead of a copy from a chat app, export at 1080 × 1920, and switch on high-quality uploads if your app shows the option. If the video only looks soft on your own phone, check Data Saver.
What resolution should I upload to TikTok?
1080 × 1920 pixels, in 9:16. TikTok’s own creative guidance asks for 720p or higher, and its ad specifications accept vertical video from 540 × 960.
Do I need a ring light?
No. A window in front of you is free and usually softer. A ring light helps after dark, or in a room without a window.
What is the best free way to improve the sound of my TikToks?
Move the mic closer first. After that, use your phone’s built-in cleanup (Audio Mix on iPhone, Audio Magic Eraser on Pixel, Audio Eraser on Galaxy) or Adobe’s free Enhance Speech.
Should I film with the front or the back camera?
Use the back camera in dim light and for anything with fine detail. The front camera is fine for talking to camera in good light, and you can see yourself while you record.
Does video quality affect the TikTok algorithm?
Not directly, as far as TikTok has said. Its explanation of the For You feed lists how people interact with videos, video information such as captions and sounds, and device settings, but not image quality. Poor light and sound do give people a reason to swipe, though, and how people watch is what TikTok measures. Our guide to TikTok watch time explains what it looks at.
The ten-minute checklist
Run through this before you film. It covers the TikTok video quality basics from this guide in six steps.
- Face a window, and switch the ceiling light off.
- Put the phone at eye level, on something steady.
- Get the mic within arm’s reach, ideally clipped on.
- Lock exposure and focus, then wipe the lens.
- Keep faces and text clear of the bottom and the right edge.
- Upload the original file, with high-quality uploads on.
Good light and clean sound won’t rescue a weak idea. They do stop a good idea from being skipped in the first second. Once a video is ready, the first hour decides how far it travels, and a small push of TikTok views can help it get started while you film the next one.